The
Dirty Little Secrets of Hull Design by Computer
Stephen M.
Hollister
Introduction
There is nothing more flexible
than a piece of paper, a pencil, and the human brain. Once you
begin using a computer for hull shape design, you are forced into
the limitations and idiosyncrasies of the program and its
underlying hull geometry technique. In exchange, however, you get
the following and more.
Many feel that because of these
benefits and capabilities, there are few or no complications or
difficulties in designing by computer. This could be blamed on
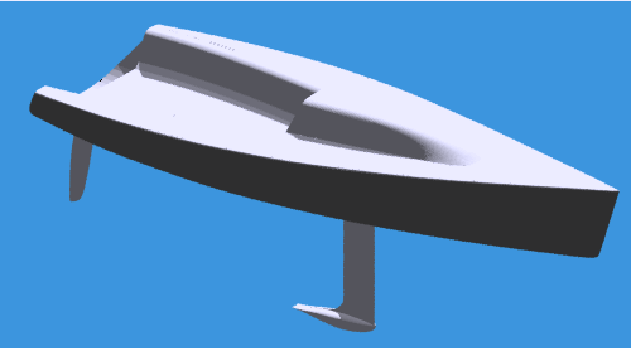
something I call "the rendering effect." One look at a
3D rendered boat hull with all of the colors, shading, and all of
the details defined in 3D, and it is hard to imagine anything a
computer can't do. When I look at a picture like that, I think of
the following:

Figure 1. Mount
Gay 30 Courtesy of Geoff Van Gorkum
Renderings may look good in a
brochure, but the 3D model used to generate the rendering may not
be accurate enough for construction purposes. Most rendering
programs hide unfairness in curved surfaces because they process
the surfaces into triangles and the shading routines smooth the
triangles to hide their edges.
This article discusses some of
the flexibility you give up and some of the difficulties you
encounter to take advantage of these benefits. These are the
"dirty little secrets" that most designers learn about
only after they buy and start to use a hull fairing program.
Designers should also know more about the tools they use and
understand what restrictions are placed on them by the program's
user interface and what restrictions are placed on them by the
underlying NURB hull geometry.
Surface Modeling
The field of geometric modeling
is huge. Two-dimensional vs. three-dimensional geometry,
wireframe vs. surface vs. solid modeling, relational vs.
parametric vs. variational geometry, parametric vs. implicit
equations, the list goes on. This article, however, will talk
only about smooth curved surface design using NURB (Non-Uniform
Rational B-spline) surfaces, since that is the dominant
mathematical technique used by most hull design and fairing
programs, such as AutoShip, FastShip, MaxSurf, Nautilus, and
ProLines. It is also the dominant technique used by
general-purpose CAD programs, such as Autodesk's Mechanical
Designer, Intergraph's Solid Edge, Trispective's 3D Eye (all ACIS
modelers), and McNeel's Rhino. If you wish to transfer exact 3D
hull geometry to other CAD programs, you will have to use NURB
surfaces (or a surface type which is mathematically compatible
with NURBs). For example, there are several companies (MolyCAM,
Lite System (1995), Formglas) that will take your
computer-generated hull shape and numerically cut a plug for the
hull out of foam using a very large milling machine. These
machines are controlled by one of several surface NC programs
like SmartCAM and MasterCAM using NURB surfaces. You will have to
provide them with a file containing the NURB surface definition
in a standard transfer file format, such as IGES (Initial
Graphics Exchange Specification).
NURBs are the best techniques
available for curve and surface design, but you have to
understand their capabilities to get the most out of your boat
design and CAD software.
What is a NURB?
NURBs are Non-Uniform, Rational,
B-splines. They are equations used to define curves or surfaces
that simulate the designer's batten in terms of stiffness and
continuity. In the early 1970's, 'B' or Basis splines were
created (There are an infinite number of splines.) as a
convenient way to define smooth curves and surfaces interactively
on the computer screen. Rather than have a curve pass through a
set of points, like ducks on a batten, a B-spline creates a curve
which is "influenced" by the positions of defining
points called vertices (see figure 2). The designer changes the
shape of the curve by changing the positions of the defining
vertex points. A curve influenced by B-spline vertex points is
smoother than a curve passing through the defining vertex points,
but the curve is by no means automatically fair. You can create
some pretty ugly curves and surfaces with B-splines. In general,
all flexible curve and surface modeling programs need some form
of fairing tool.

Figure 2. NURB
Curve Showing Defining Vertex Points
A NURB surface uniquely defines
every square inch of a rectangular-like spline membrane. For
editing purposes, it is usually represented on the screen by
drawing a grid of lines on the surface called rows and columns.
Like the NURB curve, the surface is defined by vertex points
which do not lie on the surface, but are organized as a
rectangular matrix or grid of vertex points.
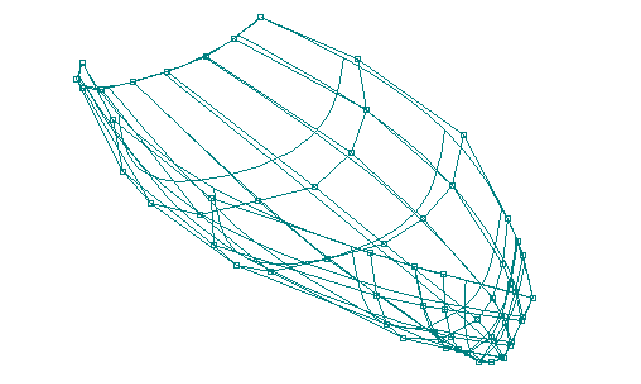
Figure 3. NURB
Surface Showing Defining Vertex Points
To understand and use NURB
surfaces effectively, you need to know what controls you have
over their shape: vertices, degree, knots, and weights.
Programs might hide this terminology from you, but you need to
know how each of these variables affect the shape of a curve and
surface.
For completeness, here is the
NURB surface equation:
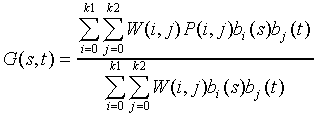
P(i,j) Matrix of vertices: nrows=(k1+1) ncols=(k2+1)
W(i,j) Matrix of vertex weights: one per vertex point
bi(s) Row-direction basis or blending polynomial functions of degree M1
bj(t) Column-direction basis or blending polynomial functions of degree M2
s Parameter array of row-direction knots
t Parameter array of
column-direction knots
Vertices - The basic shape of a NURB surface is defined by its rectangular grid of vertex or control points which do not necessarily lie on the surface. When you move one of the vertex points, the surface in that local area is pulled in the direction of the vertex movement as if it was attached to the point by a spring. (see figure 4) The surface does not move as much as the vertex point and the change only affects a small area near the moved point. The range of influence depends on the degree of the surface: a smaller degree (see the next sub-section) means a smaller area of influence and a larger degree means a larger area of influence. The main drawbacks are:

Figure 4. NURB
Curve Example of Moving a Vertex Point
Another approach is to use edit
points which lie on the surface. For every defining vertex point
"floating in space" there is an associated point which
lies on the surface. Some programs allow you to control the shape
of the surface using these points instead of the vertex points.
The two common ways to implement shape control using points which
lie on the surface are local control and global control. Local
surface control using points that lie on the surface means that
when you move a point on the surface, it is guaranteed that the
change affects the surface only in a small area surrounding that
point; the same as moving one vertex point. (see figure 5) The
problem is that when you move one of the points on the surface
using this technique, some of the surrounding defining points on
the surface also move! This technique is the same as moving a
vertex point, except that you are moving the associated point on
the surface.

Figure 5. NURB
Curve Example of Points on the Surface - LOCAL
Global surface control means that
when you move one of the defining points on the surface, none of
the other points on the surface move. This is called a full NURB
surface interpolation technique. (see figure 6) As the selected
defining point moves, the entire surface shape is affected,
although the shape change decreases dramatically as you move away
from the changed surface point.

Figure 6. NURB
Curve Exampe of Points on the Surface - GLOBAL
Although the surface
interpolation approach is global, it gives you the most accurate,
direct control over the surface. This is because you control the
shape directly and only the selected defining point moves.
Vertices or surface points can be
positioned anywhere in space and are the major shape control
factor. For fairing and detailed shape control, you need to learn
more about the following variables.
Degree - A NURB curve or
surface is represented mathematically by piecewise polynomial
blending functions of the form:
![]()
The highest exponent used in the
polynomial (3 in this case) is the degree of the polynomial. NURB
curves use one type of polynomial and NURB surfaces use two
different polynomial types (one for each grid direction -
row/column). The higher the degree of the polynomial, the more
flexibility there is in the curve or surface, but the more
wiggles it might have. Cubic, or degree 3 polynomials are
considered to have the best trade-off in flexibility and
stiffness. It is the degree used most often in CAD programs.
Quadratic or degree 2 curves and surfaces will be stiffer and
will be automatically more fair than cubic curves, but the range
of shapes they can achieve will be much more limited. Many CAD
programs fix the degree to always be 3.
Knots (Non-Uniform)
NURB curves and surfaces are
polynomials pieced together using knots or a knot vector. Curves
use one knot vector and surfaces use two; one for each grid
direction. The knots define how the polynomial pieces are blended
together with the proper smoothness. Most programs give users
only indirect control over this shape factor. It is also the
cause of many curve and surface shaping and fairing problems.
A uniform knot vector
(with constant spacing between the knots) is the most common
technique and works best for most situations. A program may
automatically adjust the spacing of the knots in the knot vector
(non-uniform spacing) to account for uneven spacing of the
rows and columns of the surface, but this may cause problems with
adjoining surfaces. Some programs also use knots to define
tension or knuckle control over the surface.
The problem with knots is that
they have a semi-global effect on surface shape. If you adjust
the knot spacing in the row direction, then the surface shape is
changed for the full length of the surface, affecting several
columns. In addition, if there is a surface attached to the end
of the rows, then it must use the same knot spacing to maintain
exactly the same edge shape. This is a major problem with knots.
Not only do they have a global affect on the surface, they can
also force changes in adjoining surfaces! Many programs avoid
these problems by fixing the knot spacing to be uniform for all
surfaces. This is a reasonable solution, but it means that the
user should create surfaces with evenly spaced rows and columns.

Figure 7.
Difference Between Uniform and Centripetal Knot Spacing
Weights - For NURB curves
and surfaces, each vertex point has an associated weight value
that affects the shape locally near that point. This weight value
is the result of the rational aspect of NURBs, which means
that the equation is defined as a fraction or ratio of
polynomials. The purposes of the weights are to allow for exact
descriptions of conic shapes and to add more user control over
the shape of the surface. Although each vertex point has its own
weight and although each weight has a local effect on the
surface, a change in a vertex weight (1.0 is the default weight)
does not necessarily change the surface the way you want. In
practice, changing a vertex weight value can cause more problems
for fairing. The best approach is to apply weight changes only
near the end of the design process to achieve very specific local
effects. Do not use weight control to create shapes that can be
achieved by moving vertex points. Some CAD programs severely
limit the user's control over weight values because of these
problems. Most hull shapes can be defined and faired without
changing the weight values.
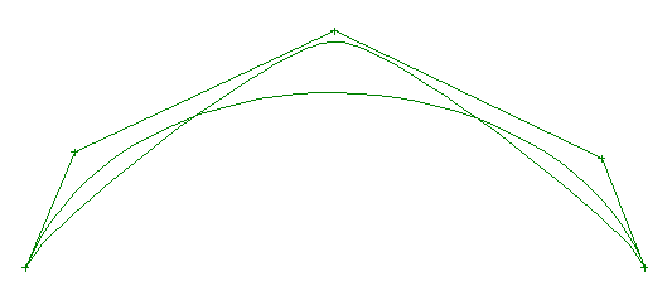
Figure 8.
Difference in Curve Shape Due to Weight Change
Now that you have been introduced
to the NURB shape controls (vertices, degree, knots, and
weights), the next section will discuss many of the hull design
problems that you may encounter and some of their solutions.
Some of the more insightful
readers might note that if a program uses uniform knot spacing
and fixes the weights to 1.0, then this would be a simple uniform
B-spline curve or surface. Then why does a CAD program use NURBS?
That is a good question and I can make a good argument that NURBs
are not necessary, even for conic shapes. I guess the reason is
that NURBs form a superset of many different spline techniques
and that if you wish to transfer surface geometry between
programs, then it is a good solution.
Dirty Little Secrets
These are some of problems you
can expect when using one of the hull design programs.
Rectangular Spline Mesh
The NURB surface is a rectangular
mesh of rows and columns with four hard corner points. The entire
surface is continuous, except for these four points. You can
stretch and distort the surface to any shape by repositioning the
vertex points, but the more non-rectangular of a shape you make,
the more difficult it will be to fair. It is the designer's job
to determine how to break down a full hull surface into a
collection of rectangular-like pieces, how to deal with the four
hard corner points, and how to maintain the proper continuity
between surfaces. There is no one way of doing this.
For example, a full keel,
wineglass shaped, sailboat hull is one of the more difficult
shapes to define. The hull is not rectangular and is difficult to
model with one surface. Figure 9 shows how the J Boat Endeavor I
was modeled by one NURB surface because the aft end of the keel
made a smooth transition up to the transom. Even so, there are
many subtle shape problems that have to be dealt with due to the
extreme distortion of the one rectangular surface.

Figure 9. J Boat
Endeavor I Modeled With One NURB Surface
Another approach is to pretend
that the keel is not there and describe the whole canoe body as
one NURB surface. You would then create a second surface to
define the keel, but you would have to attach the upper edge of
the keel surface to the canoe hull with the appropriate
continuity. This technique works best for fin keels, rather than
for full keels.

Figure 10. Fin
Keel Sailboat With Separate Surface for Keel
Still another approach is to
define the hull and keel with one surface from the bow to the
back edge of the keel. Then you would add another surface to
define the counter of the hull from the aft end of the keel to
the transom. You could even overlap and attach the surfaces to
try and maintain some level of continuity between surfaces.

Figure 11.
Overlapped Counter Defined With Separate Surface
These fitting and shaping
problems are encountered in all types and sizes of boats.
Clutter of Vertex Mesh and
Hull Shape
Since the defining vertex points
(the ones that you have to grab and move) do not lie on the NURB
surface, most programs allow you to connect the vertices with
straight lines to make them more visible. This grid of straight
lines is often called a vertex mesh. If you do not connect the
vertices with a mesh, then the vertices are floating in space and
it becomes very difficult to know which part of the hull they
influence, especially in section view. If you display the vertex
mesh, however, it clutters up the screen and hides the shape of
the hull.
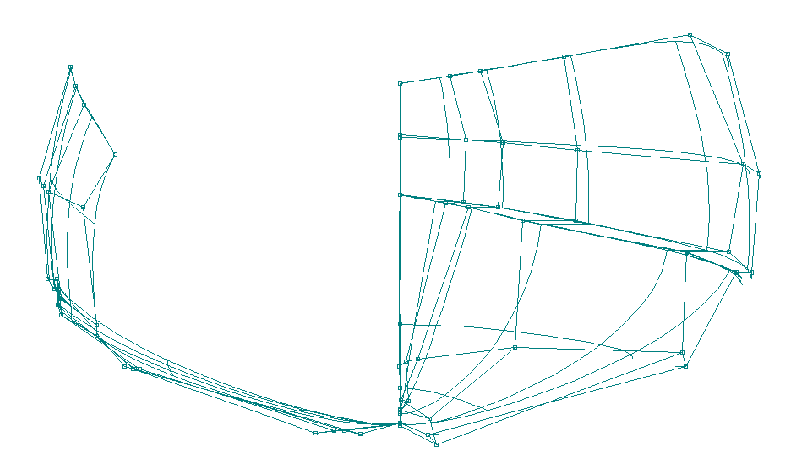
Figure 12. Hull
Showing Clutter of Vertex Lines
To avoid this problem, some
programs use points which lie on the surface of the hull. This
cleans up the clutter and makes the hull easier to see and
manipulate.
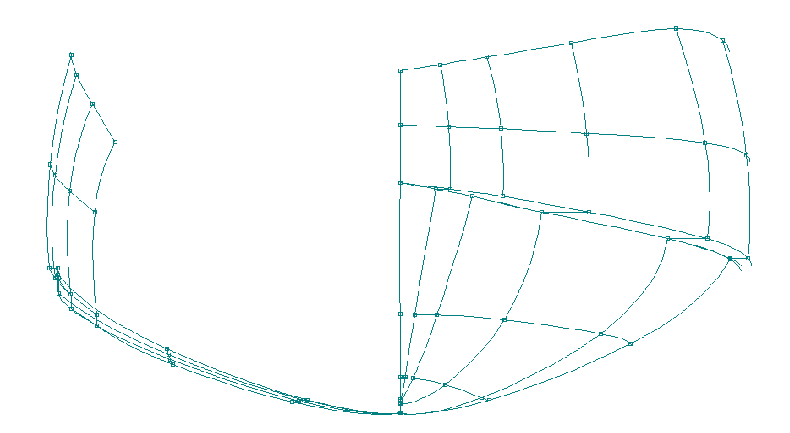
Figure 13. Hull
Showing On-Surface Edit Points
Waterlines, Buttocks, and
Diagonals Cannot be Controlled Directly
NURB surfaces are defined using a
grid of row and column vertex points that can be moved anywhere.
You cannot directly grab and alter the shape of any traditional
lines of the boat, such as waterlines, buttocks, and diagonals.
These lines are considered to be derived lines or surface cuts
which can be automatically calculated from the surface
definition. Some programs, however allow you to display these
lines while dragging a control point so that you can immediately
see what happens when a vertex point is moved. To change the
shape of a waterline, for example, you have to move the vertex
point which lies closest to the point on the waterline you wish
to change. This is the biggest adjustment required by the
experienced hand draftsmen.
Adding and Deleting Rows and
Columns
One can start with a very simple
NURB surface consisting of two rows and two columns, and then add
in additional rows and columns to increase the flexibility and
control of the surface. In doing so, the program must add the row
or column in over the entire length or width of the surface.
There is no allowance for partial rows or columns. This means
that if you want to add rows and columns near the bow to define a
bulb, then these rows and columns must extend over the entire
length and width of the surface, whether you want them to or not.
Remember that the only way to add shape control is by adding in
control vertices, and the only way to add in control vertices is
by adding them in as a complete row or column.
Spacing of Rows and Columns
The smoothest surface shape
depends on a relatively even spacing of the rows and columns. If
there is more than a 2 to 1 ratio of consecutive row or column
spacing, you will begin to see some very strange anomalies, such
as hard bumps and loops. A program could adjust the knot vector
to minimize the bumps and loops of uneven spacing, but this
adjustment can cause other difficulties. For example, if two
surfaces are to be joined exactly, edge-to-edge, then the two
surfaces must have the exact same knot vector at that edge. If
you have several surfaces attached together with common edges
(like most multi-chine vessels), then a change in the knot vector
in one surface can affect the shape of all of the connected
surfaces. One technique in dealing with attached surfaces is to
use uniform knot spacing and always add in rows or columns by
splitting the difference between two existing rows or columns.
This will always maintain a reasonable 2 to 1 ratio in row and
column spacing acceptable for uniform spacing.
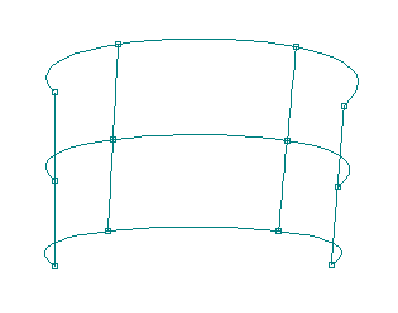
Figure 14. Uneven
Spacing of Columns
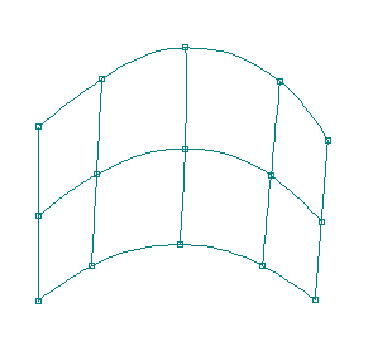
Figure 15. Add
Column to Create Even Spacing
Piecing Together Surfaces
Rarely can you use one NURB
surface to define a whole boat. If chines and deck edges form the
edges of the NURB surfaces, you need to understand the
requirements of attaching two surfaces together. There are two
types of attachment: exact and approximate. To form an exact
attachment between two surfaces, at a chine, for example, the two
surfaces must match up exactly along their entire length. The
common surface edges must have the exact same edge vertex points,
they must use the exact same polynomial degree at the edge, they
must use the exact same knot vector at the edge, and they must
use the exact same weight values at the edge. Otherwise, the
mathematical definition and therefore, the shape of each surface
at the chine will be different. If the two surfaces do not agree
exactly at the common edge, then the attachment is considered to
be approximate. It is then up to the user to manually make sure
that the two approximate edges are within building tolerances of
each other. If two surfaces match exactly and the user adds a
column which runs into the attached surface, then the program
must add a column to the attached surface or the two surfaces
will not be joined exactly anymore.
Matching up existing designs
The original goal of B-splines
was to create smooth curves and surfaces interactively on the
computer screen. That is why they use vertices which do not lie
on the curve or surface. But these floating vertices make it
difficult to recreate shapes that currently exist. For example,
if you have a table of offsets and wish to create a NURB surface
representation of that shape, you will have difficulty trying to
position the vertices to achieve that shape. Some programs allow
you to digitize the sections of an existing boat and to use that
as an interactive guide for moving vertex points. You move the
vertex points until the surface section shape matches the
digitized station shape. This is a very tedious process. A better
approach is to automatically fit the NURB surfaces to the offset
data or the digitized stations so that the surface passes through
the offset points. You will still have to perform the final
shaping and fairing, but the matching-up time will be greatly
reduced.
For those interested in scanning
in a bodyplan of a boat, it is not quite that simple. Most
bodyplans consist of overlapping stations which cause a problem
when the scanner program tries to convert the scanned-in black
dots to form polylines which represent unique stations. You end
up spending a lot of time in your CAD program fixing up the
mistakes.
Fairing
For example, one of the tricks in fairing a manual spline is to lift certain ducks for a moment to "relax" the batten. This smooths the curve, but it doesn't necessarily maintain the shape that you want. With the computer, you have the same problem of getting the shape you want and making sure that the shape is fair. Automatic computer fairing techniques may smooth a surface, but they do not have the human judgement to make this shape vs. fairness trade-off.
Some programs say they guarantee
fairness of a curve or surface, but this is only an opinion and
is done by severely limiting the shape of the surface. For
example, if someone gave you a batten and three ducks, it would
be difficult to create a curve which was not considered to be
fair. On the other hand, you would be severely limited in the
range of shapes you could draw.
Most hull design and fairing
programs provide ways to check the fairness of a hull by using
some form of second derivative or curvature curve, and by using
some form of surface curvature color mapping. Designers don't
need to know the mathematics behind these techniques, they just
need to see how the technique magnifies all bumps, wiggles, and
inflection points. The designer interactively changes the shape
of the hull to obtain a smooth derivative or curvature curve. As
you can see, the designer is actively involved with the fairing
process.

Figure 16. NURB
Curve With Unfair Overlaid Curvature Curve

Figure 17. NURB
Curve With Faired Overlaid Curvature Curve
The problem with fairing NURBs is
that the surfaces are so sensitive to the knot values. If a
program uses uniform knot spacing, then the NURB surfaces need to
have fairly evenly spaced rows and columns. When the knot spacing
does not match the spacing of the rows and columns, you will have
fairing problems. When a NURB surface is stretched into a very
non-rectangular shape, even non-uniformly spaced knots do not
help. In addition, non-uniform knots cause other problems, as
mentioned before.
Another problem is that you
cannot control the shape of the lines (waterlines, buttocks,
etc.) directly. You can only change the shape of the rows and
columns of the surface. In practice, it is relatively easy to
obtain the station and buttock shapes you want, but the
waterlines will always be a problem. The reason for this is that
a waterline cut through the surface does not typically relate to
either a row or a column on the surface. This means that to shape
and fair a waterline, you need to change the shape of both the
rows and the columns. Depending on the shape of the boat and how
much the NURB surface has been stretched to fit the hull, you
will have a greater or lesser problem with the waterlines.
Part of this problem has to do with how hand draftsmen cheat when they draw the lines of a boat. The goal of traditional hand drafting is to match up the different views of the lines and to fair the lines at the same time. For most cases, fairing the lines wins out over making sure that the three views of the lines match up exactly. For good draftsmen, the errors in matching views are within building tolerances. For NURB surfaces, however, all three views always match exactly. You cannot cheat just to get a waterline or buttock to look good. In addition, the programs can "cut" any waterline or buttock, so it is easy to evaluate the full 3D shape of the boat. You cannot gloss over the very subtle shape problems commonly found in waterlines. What makes it worse is that the surface curvature display tools can magnify every last little bump and wiggle, so it is impossible to fair a surface perfectly. Your goal should be to fair the boat to within building tolerances and not to worry about how perfect the lines look.
Vertex Weight Values
Although weights have a local
influence on the shape of the surface, manipulating their values
can be difficult. A common approach is to try to obtain the
desired surface shape by only adding and manipulating rows and
columns of vertices. After you have roughed out the hull shape,
you can then change the weight values to achieve specific local
effects. Most boats, however, can be defined without changing the
vertex weight values. Only experienced users should try
manipulating these values.
Relational vs. Trimmed
Surfaces
There has been some discussion
between two ways of attaching or connecting surfaces: trimmed
surfaces vs. relational or attached surfaces. For trimmed
surfaces, one surface is pushed through another and the program
automatically trims off the overlap. An example of this is to
push the top of a fin keel through the bottom of a canoe body of
a sailboat. For relational or attached surfaces, the top edge of
the keel surface is attached to the canoe body of the hull. If
the top of the keel is changed, it will always stay attached to
the hull, and if the hull changes shape, the top of the keel will
stay attached.
The obvious advantage of
attaching one surface to another is that you do not have to worry
about whether the surfaces intersect if one or the other surface
changes shape. The downside is that if the attached-to surface
changes shape, then the attached surface changes shape. For the
keel and canoe-body attachment example, if the hull changes shape
near the keel, then the attached keel changes shape. For
airfoil-shaped keels, you do not want a change in hull shape to
change the shape of the keel. Likewise, if you attach a cabin top
to a deck and then decide to shift the cabin fore or aft while
still attached, then the cabin top will change shape. For trimmed
surfaces, you would just have to make sure that the cabin sides
penetrate the deck surface by a little bit. The shape of the
cabin top is independent of the shape of the deck. You can
"pick up" the cabin, shift its position, and set it
down on the deck (penetrate the deck) without changing its shape.
There are benefits and
disadvantages to both approaches. Attachment or relational
geometry works best when the two surfaces or geometry shapes
relate and are dependent on one another, such as when you attach
longitudinal stringers to the inside of a hull. Trimmed surfaces
work best when the two surfaces must be joined, but their shapes
are independent of each other. Trimmed NURB surfaces also work
best if you need to convert the surface model to industry
standard solid modelers. Relational attaching of one surface to
another can leave very small gaps between the surfaces which are
very difficult to deal with in solid modelers.
Calculations
All of the hull design programs
use open surface design geometry. None of the programs use solid
modeling, which requires a complete, closed solid geometry at all
times. Solid modeling has some advantages when it comes to
calculations, but it makes the process of modeling the geometry
much more difficult. This means that the boat design software has
to do a lot of work to calculate the hydrostatics and stability
of a vessel.
The first step is to cut all of
the surfaces at a series of station positions along the length of
the hull. The next step is to somehow combine these surface cuts
into realistic, closed station shapes. This can be very difficult
for intersecting and open surfaces, and for surfaces that do not
quite match up exactly along common edges. Once legal station
shapes have been formed, the program can use the desired
waterplane to clip off their above-water portions. Finally, some
form of longitudinal integration can be performed to produce the
final results. For all of these programs, the key to obtaining
accurate results is to verify the final shapes of the cut
stations before the calculations are done. If the stations look
good (and you have enough of them covering the length of the
vessel), then the results should be accurate. Be aware that many
problems can arise during the station cutting and reconstruction
phase.
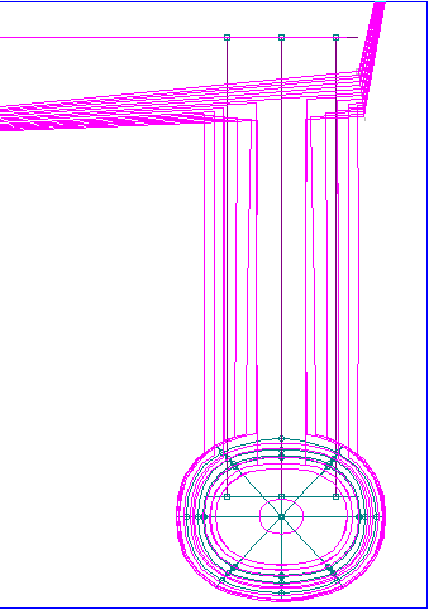
Figure 18. Portion
of SWATH Showing Trimmed Surfaces to Create Stations
Conclusion
NURBs are the dominant
mathematical technique used for designing curves and surfaces. In
spite of this, there are many things you need to know to get the
most out of your hull design or CAD program. This article
discussed many of these hidden problems. Since all NURB-based
programs vary greatly, the best advice is to get the demos of all
of the boat/ship design programs and spend some time with them
trying to design and fair a boat. The user interface of a program
can have as much of an impact on your ability to get the job done
as which mathematical technique is used to define the hull. Don't
wait until after you buy the program to learn the truth.